Watercolor Art by James N. 2019
Project Description
This project involves creating a watercolor painting for a global art exchange project. It provides an opportunity for students to use the techniques learned from practice exercises and trial and error explorations in watercolor to formulate an artwork that is personal and includes ideas of peace, friendship, kindness.
Learning Objectives
Students will be able to create watercolor paintings with personal voice and expression and participate in an art exchange with other student artists locally or globally. Students will apply choice watercolor painting techniques learned in previous practice to their final watercolor. Students will reflect on their learning and artwork with artist statements and post their work to their website.
Introduction
Watch this video: Inspiration for Portraits - Afghanistan
Driving Questions
- How can we communicate visual ideas with people of other cultures, languages, religions, and races?
- How can exchanging visual ideas with people globally inform our perceptions of ourselves and others?
- How can artists use drawing and painting skills to connect personal meaning to their art?
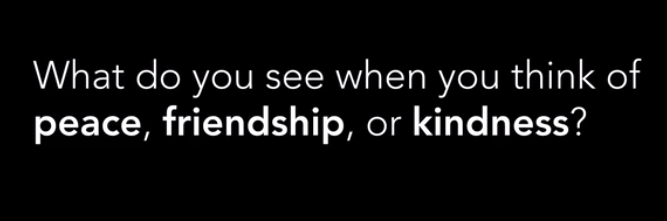
- How can we visualize peace, friendship, and kindness through art?
Website Resources
Website 1: The Memory Project Global Art Exchange
Website 2: www.afghanistan-parsa.org PARSA is a 23-year-old nonprofit that works to support Afghan leaders to effect change in their communities. We run programs for youth, women and families in 19 of Afghanistan's 34 provinces, and are one of the few international organizations working in Afghanistan that operates at the grassroots level.
Website 3: Sisters-4-Sisters
Website 4: Watercolor Practice assignment
Need to Knows
- Before the project begins, the class needs to make a need to know list of things we need to know prior to creating the artworks and things we need to consider while creating them.
- The class must decide how to go about creating the list and where the list should be located in the room or in a digital location.
- Choose a group to lead the need to know discussion and make sure the location of the need to know list is known and avialble to all the class.
Project Directions
Step 1: Brainstorm
- Brainstorm ideas in your sketchbook individually. Fill one page with thoughts, drawings and ideas.
- The prompts for brainstorming are below from the video on this webpage.
- The art you create can show something real or you can use your imagination.
- It can be anything special that you would like to share with a child across the world.
|

|

|
Step 2: Project Requirements
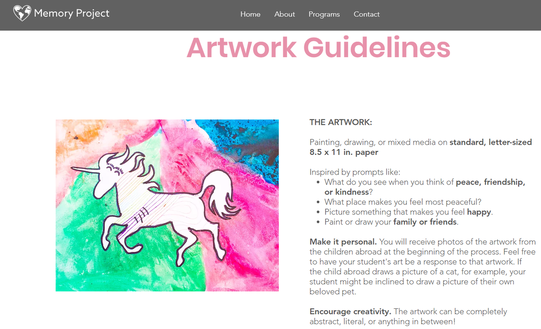
- Visit the Memory Project Website or view the artwork guidelines from the Memory project website.
Step 3: Project Planning
- Look at your brainstorming ideas in your sketchbook.
- Plan a more detailed idea for this project in your sketchbook.
- Include sketches, writing, inspirations, resources, and feel free to collaborate with peers to discuss ideas and formulate plans.
- Decide if you want to create works in a group or individually.
- Look through your practice watercolors to remind you of the techniques you could incorporate into this project.
- You may use any watercolor techniques you would like to complete this artwork.
- If you decide to create work in a group, discuss the idea with your instructor so there are enough artworks created to exchange.
Step 4: Painting Process
Gather your supplies and begin your painting. Read these project process suggestions below.
Gather your supplies and begin your painting. Read these project process suggestions below.
- Watercolor paper must be 8.5 x 11 inches or smaller.
- Use painters tape to adhere the paper to a flat board.
- Apply a thin coat of water to the paper prior to adding watercolor.
- You can draw images lightly in pencil first.
- You can lay down a wash or color before you lightly draw.
- You may use sharpie or other materials with the watercolor is it fits your purpose.
- If you are working on a collaborative work, discuss ideas and agree on each person's contributions to each work.
- You can outline areas with Sharpie after you watercolor if needed.
- Sign your work at the bottom left or right when it is complete.
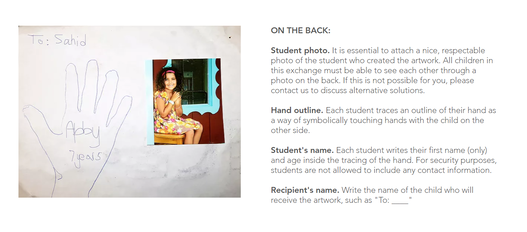
- Each person will trace their hand on a separate paper and follow the directions above for the back of the artwork.
- Get your photo taken in class by the student photographers.
- Apply your final photo to the hand tracing paper with a glue stick. NEVER USE LIQUID SCHOOL GLUE ON THE BACK OF WATERCOLOR PAPER!
- Apply your Hand tracing paper to the back of the artwork with rubber cement.
- Take a high quality photo of your final art work front and back.
- Self assess your planning and final art on the rubric.
- Turn in your final work for assessment and to mail.
- Be proud of your work!
Step 5: Website Posting & Small Group Discussion
- Add your images of your artwork to your website to your painting page.
- You are required to add the artwork front image and it is optional to add the back image.
- Add a title to the webpage and to the artwork.
- Add a description of the artwork to your webpage.
- Self-assess your website posting on the website posting rubric.
- Participate in the small group discussion.
- Take notes during the discussion if necessary.
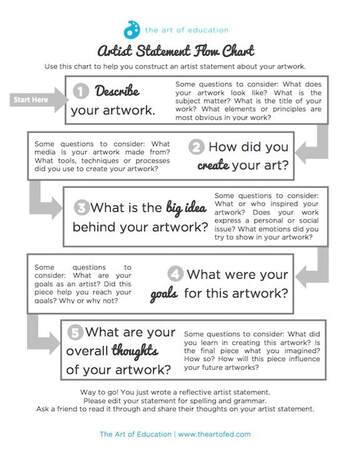
Step 6: Artist Statement/Reflection
Create and artist statement as a reflection of your artwork.
Visit The Art of Ed website and read this short article about writing an artist statement. The flow chart below is from the article and guides you through the steps of creating an artist statement.
Visit The Art of Ed website and read this short article about writing an artist statement. The flow chart below is from the article and guides you through the steps of creating an artist statement.
Assessments
The basic rubrics for this course are located in this Google Document: Art Rubrics
Project Brainstorming and Planning: Art Standard 1
Watercolor Painting: Standard 2, 3, 6, and 10
Website Posting (Separate rubric provided) : Standard 2, 3, and 5
Reflection: Standard 8
Watercolor Painting: Standard 2, 3, 6, and 10
Website Posting (Separate rubric provided) : Standard 2, 3, and 5
Reflection: Standard 8
